

If you’re looking to tile a floor at home, there’s a very high chance you’re already considering underfloor heating. After all, it provides a comfortable, convenient and energy-efficient way to heat up any room.
We’re big fans of electric underfloor heating systems in particular and in this article, we’ll guide you through all you need to know.
What is electric underfloor heating?
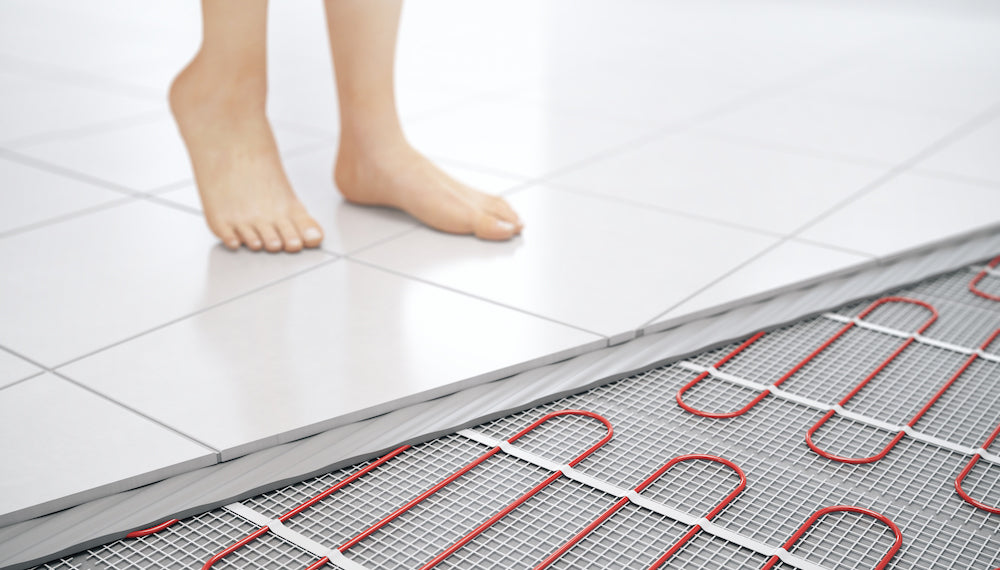
Electric underfloor heating systems consist of a thin wire, connected to different sized mats. As the name suggests, these mats are installed beneath your tiles and are connected to your household wiring.
When the heating system is turned on, an electric current runs through the wires and is converted into heat, which travels up through the floor tiles and into your room. The mats are connected to a thermostat, which helps you control the temperature.
Electric underfloor mats provide radiant heating with many benefits over both conventional central heating systems and water-based or ‘hydronic’ underfloor pipes.
What is radiant heating?
Unlike conventional radiators which warm the air directly, radiant heating systems work by warming the floor, which in turn warms the air in the room. So in the case of electric heating mats, the current in the wire generates heat which radiates up through your floor tiles and into the room.
Radiant heating is a more efficient form of heating as at lower running temperatures, it creates the same level of warmth as other heating systems such as gas combi boilers. Having warm feet tricks your brain into thinking you are warmer than you would be with cold feet - a fact backed up by scientific research!
The benefits of electric underfloor heating
Aside from offering a radiant form of heating, our underfloor heating mats offer numerous benefits compared to both traditional central heating systems and alternative hydronic underfloor heating systems.
Easy and quick to install
Other heating systems are notoriously complex and must always be installed by a professional. In comparison, electric underfloor heating are a doddle - the system consists of a mat and a controller or thermostat. While this must be connected by a qualified electrician, your tiler can install the heating mat, ensuring no delays to your tiling project.
Ideal for renovations
As they’re comparatively quick and easy to install, electric underfloor heating mats are the preferred form of heating for refurbishment projects in any room at home. They can be connected to your electrical system without having to disconnect or disturb your existing central heating system.
Less disturbance in your home
Apart from the recommended layer of self-levelling compound, installing electric underfloor mats is a dry process. With no pipes to embed in concrete screed, very little waste and mess should be created.
Cost
On a like-for-like basis, the cost of installing electric underfloor heating mats is almost always lower than alternate forms of heating. And with gas prices at record highs in 2022, the running costs of electric mats are now lower than central heating systems - although this may depend on other factors, discussed below.
Contemporary design
By running underfloor heating as your primary heat source, you can lose bulky radiators and open up your wall space. This is great for flowing spaces in busy family homes and it also allows you more freedom when placing furniture and other elements within your room.
A healthier option
Traditional radiators create an air cycle in the room, which can move dust and mites around and cause problems if you suffer from allergies or asthma. These issues are minimised if you choose underfloor heating mats, as the air currents are minimised. Radiant heating also helps to keep the air fresh, whereas radiators often make air feel dry and uncomfortable.
Fit and forget
With no moving parts, electric underfloor heating mat work day in, day out, over a long period of time. There are no boilers to service each year or potential leaks to consider. And if you test our mats correctly before, during and installation, they come with a lifetime warranty!
Extremely versatile
Electric underfloor heating mats come in a wide range of sizes. There’s something to suit almost every space, from awkward hallways through to luxury en-suites. And for larger rooms, you can fit multiple mats onto a single thermostat.
Will underfloor heating raise my floor level?
Our electric underfloor heating mats are an ideal choice if you are concerned about floor heights. As the heating wires are only 2mm thick, the floor build up is very minimal.
Please note that once the mats are installed, we recommend a layer of self-levelling compound is poured over to protect the wires. You may also need to consider the additional height of insulation boards, if you choose to incorporate these in your project.
What different underfloor heating mats are available?
Our electric heating mats are available in two power variants:
-
160W per m2 - Ideal for smaller rooms where another heat source is available. For example, these mats may provide comfort underfoot in a family bathroom with a wall-mounted towel warmer.
- 200W per m2 - Ideal for rooms subject to high heat loss or without a primary heat source. For example, in a conservatory or larger room.
To help you make your decision, it’s best to ask yourself if the electric heating mats will be the primary source of heating. If so, we would almost always recommend choosing the 200W matting.
What kind of thermostat do I need with underfloor heating?
You'll need a thermostat to turn your underfloor heating system on/off and control the temperature. Most themostats are wall mounted and are connected to the electric mats via a cable buried in the wall cavity.
While some 'generic' thermostats are available, we'd always advise using a thermostat that's designed to work with a particular matting system. We currently offer three different thermostats, from a simple controller to a sophisticated wi-fi unit, that allows you to control your heat from anywhere. Each thermostat is available in two contemporary colours.
- Button Press Thermostat
Available in Silver and White, these entry-level thermostats are extremely simple to use. Designed with DIY in mind, they're easy to install and feature popular 5/2 and 7 day programs.
- Touch Screen Thermostat
Available in White and Black, these thermostats feature a large touchscreen. Their designer style is conplemented by their sophisticated technology - as well as the classic programs, they also feature a Holiday mode and self-learning, to help improve efficiency and lower your energy bills.
- WiFi Thermostat
Our Touch Screen thermostats also come with a WiFi option. This means you can instantly control your underfloor heating from your phone, from anywhere! Two contemporary colour options are available - Black and White.
Can I lay electric underfloor heating mat myself?
Absolutely! Our electric underfloor heating system is extremely simple and consists of the wired mat, a thermostat and a temperature sensor.
While the thermostat must be connected to your household wiring by a qualified electrician, you can fix the mats and sensor yourself.
Simply roll out the mats over your floor - they have a sticky mesh to help them adhere to the surface - and create a channel for the sensor to sit in.
It’s a relatively straightforward process, especially if you’re a DIY enthusiast. We’ll take you through the installation stages in more detail below.
Can I lay underfloor heating onto concrete?
You can install our heating mats directly onto concrete. However, if your concrete is uninsulated, then a good deal of the heat produced - over a third in extreme cases - may be lost into the ground.
Instead, we recommend that our insulation boards are fixed to the concrete first. These work to increase the efficiency of your heating mats in two ways, by providing a thermal barrier to cold rising from below and by reflecting the heat from the system up into the tiles.
The time it takes to heat your floor up will be significantly reduced, along with your energy bills.
Can I lay underfloor heating onto floorboards?
Although you can fit electric heating mats onto a marine ply base, we don’t recommend that they are installed directly onto floorboards. They’re likely to expand with the heat generated and this can cause tiles to crack.
Instead, you should fit insulation boards onto the floorboards, before laying the heating mats and proceeding to tile.
How long do floors take to warm up?
This depends on a number of factors, including the system you use, how well insulated your subfloor is and the thickness of your tiles.
As a guide, if you are using our powerful 200W per m2 system with 10mm insulation boards, you should expect your floor to heat up in less than an hour.
How much does underfloor heating cost to run?
Although some manufacturers claim running costs lower than 1p per square metre per hour, it’s very difficult to give precise figures. There’s a lot of factors at play, including your home’s design, how well insulated your floors are and the specific energy tariffs you’re on.
However, running costs do tend to be reasonable, especially if you incorporate thermal insulation boards into your subfloor. The quicker your floor can heat up, the lower your bills!
At the time of writing in August 2022, running costs are extremely favourable compared to central heating systems, due to the record high gas prices in the UK market.
Is electric underfloor heating safe to use in bathroom?
Electric underfloor heating mats are an incredibly safe option for any room, including bathrooms. While water and electricity are a dangerous mix, the heating wires are embedded under the tiles and incorporate three layers of insulation.
Furthermore, as the system is hidden, there are no exposed surfaces that could cause injury. For example, hot towel warmers are potentially unsafe if you have small children around.
How to measure for underfloor heating
To measure for underfloor heating, you will have to calculate the ‘heated floor area’ and then round this down to the nearest mat size. You should always round down to a smaller mat, as the heating wires cannot be cut short.
To calculate the heated floor area:
- Accurately draw your room layout out on paper
- Include any fixed elements, as detailed below
- It’s recommended to not run heating mats under these fixed elements
- Leave a 50mm gap around the perimeter of the room that will be unheated
- Mark out the floor area that will be covered with the heating mats
- Calculate the size of this and round down to the nearest mat size
So for example, if your heated floor area measures 10.5 m2, then you should choose a 10 m2 mat size.
Fixed elements include baths, toilets, shower trays, kitchen cabinets, kitchen islands and floor standing fridges.
Can you join heating mats together?
Although you cannot join heating mats together, you can connect two or more mats into the same thermostat. This means that you can control the heating over a larger floor space from one control unit.
You’ll need to ensure that your heating system doesn’t exceed the controller rating, otherwise a ‘contactor snubber’ switch may be required - please discuss this with your electrician.
While it’s often preferable to loop mats together over larger floors, it can sometimes be a good idea to zone your space.
For example, if your tiles run from your kitchen through to your hallway, you may wish to have two separate heating systems with two separate thermostats. This means you can control the temperatures in each zone individually.
How to install electric underfloor heating
Whether your current subfloor is concrete or floorboards, we recommend installing thermal insulation boards to increase the performance of your new system.
- Brush and vacuum the floor so it’s clear of debris
- If you have a concrete floor, this will need to be sealed using a suitable primer
- Dry lay the installation boards. You will need to stagger the boards in a brick bond fashion
- Cut any boards to suit using a Stanley knife
To fix the boards in place:
On concrete
Use a thin 3mm bed of Rapid Setaflex tile adhesive
On floorboards
In addition to the bed of tile adhesive, mechanically fix the boards to the floorboards using screws and dedicated washers. You will need to use 15 screws for each board, as 30cm centres. Tighten each screw through a washer, until the screw head is flush the the surface of the board
Then, use plasterer’s scrim tape to reinforce the joints between the boards and mark the position of any fixed elements on the floor, using tape or marker pen.
The floor is now prepped and ready for the underfloor heating to be fitted.
- Start the matting run as near as possible to the thermostat
- Roll the mat out in the direction of the opposite wall.
- Although the mat is sticky and will stay flat on the floor, you can use your hands to spread it out
- When you reach the opposite wall, use scissors to cut the mat.
- Flip it around and run it back, in the alternate direction
- You can detach the heating cable from the mat, to help run the cable around any awkward obstacles or fittings
- The heating cables can never touch, overlap or be cut
Both the cold lead wire (that connects the mat to the thermostat) and the floor sensor need to be wired into the thermostat.
- Run these to the thermostat through a conduit in the wall
- Use a Stanley knife to create two shallow grooves in the insulation boards, for the floor sensor and cold lead to sit in. This way, they will not interfere with floor heights
- For accurate temperature readings, the floor sensor should sit between two runs of the heating wire, in the middle. It should run at least 30 cm into your heated floor area
- We advise taking a photograph of your floor at this stage, for future reference
- If you’re installing two or more mats, make sure that each cold lead wire reaches the thermostat.
- Although you can tile directly onto underfloor heating mats, we recommend protecting the wires with a 3mm layer of self-levelling compound. This will protect the wires from the sharp metal teeth of a notched trowel and provide a flat surface for tiling.
Please also note the following:
- Using a multi-meter, you should test your heating mats before, during and after installation, to confirm they are in good working order
- A qualified electrician will need to make the final connection to your electricity mains and approve your installation
- Once tiles have been fixed, allow the adhesive and grout to dry naturally. You should not use the underfloor heating system to speed this process up - it’s best to wait a minimum of two weeks, before commissioning the system